Build jobs are at the heart of the Jenkins build process. Simply put, you can think of a Jenkins build job as a particular task or step in your build process. This may involve simply compiling your source code and running your unit tests. Or you might want a build job to do other related tasks, such as running your integration tests, measuring code coverage or code quality metrics, generating technical documentation, or even deploying your application to a web server. A real project usually requires many separate but related build jobs.
Our sample application is a simple Java implementation of John Conway’s “Game of Life.”[2] The Game of Life is a mathematical game which takes place on a two dimensional grid of cells, which we will refer to as the Universe. Each cell can be either alive or dead. Cells interact with their direct neighbors to determine whether they will live or die in the next generation of cells. For each new generation of cells, the following rules are applied:
-
Any live cell with fewer than two live neighbors dies of underpopulation.
-
Any live cell with more than three live neighbors dies of overcrowding.
-
Any live cell with two or three live neighbors lives on to the next generation.
-
Any dead cell with exactly three live neighbors becomes a live cell.
Our application is a Java module, built using Maven, that implements the core business logic of the Game of Life. We’ll worry about the user interfaces later on. For now, let’s see how we can automate this build in Jenkins. If you are not familiar with Maven, or prefer Ant or another build framework—don’t worry! The examples don’t require much knowledge of Maven, and we’ll be looking at plenty of examples of using other build tools later on in the book.
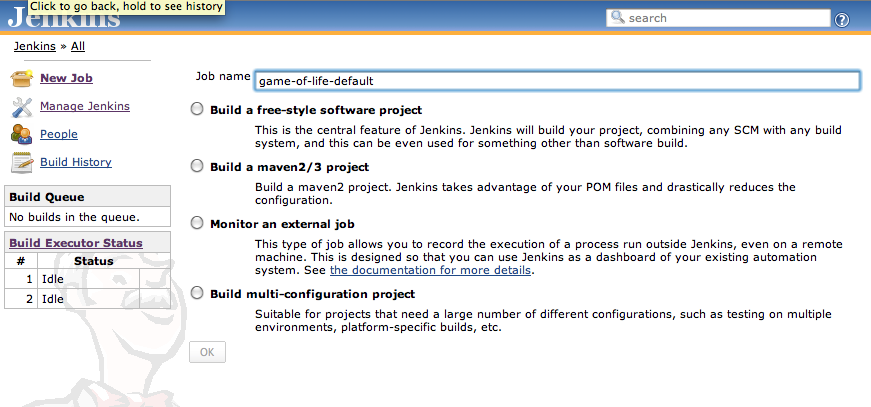
For our first build job, we will keep it simple: we are just going to compile and test our sample application. Click on the New Job link. You should get to a screen similar to Figure 2.14, “Setting up your first build job in Jenkins”. Jenkins supports several different types of build jobs. The two most commonly-used are the freestyle builds and the Maven 2/3 builds. The freestyle projects allow you to configure just about any sort of build job: they are highly flexible and very configurable. The Maven 2/3 builds understand the Maven project structure, and can use this to let you set up Maven build jobs with less effort and a few extra features. There are also plugins that provide support for other types of build jobs. Nevertheless, although our project does use Maven, we are going to use a freestyle build job, just to keep things simple and general to start with. So choose “Build a freestyle software project”, as shown in Figure 2.14, “Setting up your first build job in Jenkins”.
You’ll also need to give your build job a sensible name. In this case, call it gameoflife-default, as it will be the default CI build for our Game of Life project.
Once you click on OK, Jenkins will display the project configuration screen (see Figure 2.15, “Telling Jenkins where to find the source code”).
In a nutshell, Jenkins works by checking out the source code of your project and building it in its own workspace. So the next thing you need to do is to tell Jenkins where it can find the source code for your project. You do this in the Source Code Management section (see Figure 2.15, “Telling Jenkins where to find the source code”). Jenkins provides support for CVS and Subversion out of the box, and many others such as Git, Mercurial, ClearCase, Perforce and many more via plugins.
For this project, we will be getting the source code from the GitHub
repository we set up earlier. On the Jenkins screen, choose “Git” and
enter the Repository URL we defined in Section 2.2.5, “Forker le dépôt des exemples”
(see Figure 2.15, “Telling Jenkins where to find the source code”). Make sure this is
the URL of your fork, and not of the original repository: it should have
the form
git@github.com:<username>/game-of-life.git,
where <username> is the username for your
own GitHub account. You can leave all of the other options up until here
with their default values.

Once we have told Jenkins where to find the source code for our application, we need to tell it how often it should check for updates. We want Jenkins to monitor the repository and start a build whenever any changes have been committed. This is a common way to set up a build job in a Continuous Integration context, as it provides fast feedback if the build fails. Other approaches include building on regular intervals (for example, once a day), requiring a user to kick of the build manually, or even triggering a build remotely using a “post-commit” hook in your SCM.
We configure all of this in the Build Triggers section (see Figure 2.16, “Scheduling the build jobs”). Pick the Poll SCM option and enter “*
* * * *” (that’s five asterisks separated by spaces) in the Schedule box.
Jenkins schedules are configured using the cron syntax,
well-known in the Unix world. The cron syntax consists
of five fields separated by white space, indicating respectively the minute (0–59), hour (0–23), day of the
month (1–31), month (1–12) and the day of the week (0–7, with 0 and 7
being Sunday). The star is a wildcard character which accepts any valid
value for that field. So five stars basically means “every minute of every
hour of every day.” You can also provide ranges of values: “* 9-17 * * *”
would mean “every minute of every day, between 9am and 5pm.” You can also
space out the schedule using intervals: “*/5 * * * *” means “every 5
minutes,” for example. Finally, there are some other convenient
short-hands, such as “@daily” and “@hourly”.
Don’t worry if your Unix skills are a little rusty—if you click on the blue question mark icon on the side of the schedule box, Jenkins will bring up a very complete refresher.

The next step is to configure the actual build itself. In a freestyle build job, you can break down your build job into a number of build steps. This makes it easier to organize builds in clean, separate stages. For example, a build might run a suite of functional tests in one step, and then tag the build in a second step if all of the functional tests succeed. In technical terms, a build step might involve invoking an Ant task or a Maven target, or running a shell script. There are also Jenkins plugins that let you use additional types of build steps: Gant, Grails, Gradle, Rake, Ruby, MSBuild and many other build tools are all supported.
For now, we just want to run a simple Maven build. Scroll down to the Build section and click on the “Add build step” and choose “Invoke top-level Maven targets” (see Figure 2.17, “Adding a build step”). Then enter “clean package” in the Goals field. If you are not familiar with Maven, this will delete any previous build artifacts, compile our code, run our unit tests, and generate a JAR file.

By default, this build job will fail if the code does not compile or if any of the unit tests fail. That’s the most fundamental thing that you’d expect of any build server. But Jenkins also does a great job of helping you display your test results and test result trends.
The de facto standard for test reporting in the Java world is an XML format used by JUnit. This format is also used by many other Java testing tools, such as TestNG, Spock and Easyb. Jenkins understands this format, so if your build produces JUnit XML test results, Jenkins can generate nice graphical test reports and statistics on test results over time, and also let you view the details of any test failures. Jenkins also keeps track of how long your tests take to run, both globally, and per test—this can come in handy if you need to track down performance issues.
So the next thing we need to do is to get Jenkins to keep tabs on our unit tests.
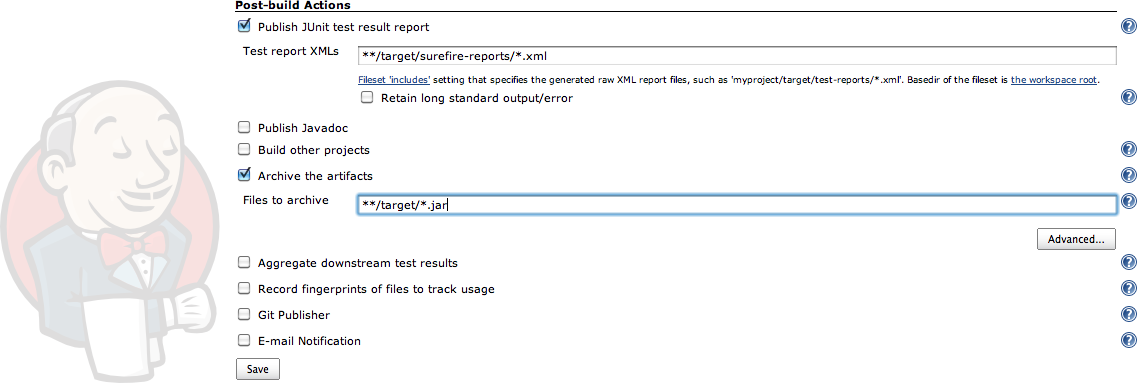
Go to the Post-build Actions section (see Figure 2.18, “Configuring JUnit test reports and artifact archiving”) and tick “Publish JUnit test result
report” checkbox. When Maven runs unit tests in a project, it
automatically generates the XML test reports in a directory called
surefire-reports in the target directory. So enter
“**/target/surefire-reports/*.xml” in the “Test report XMLs” field. The
two asterisks at the start of the path (“**”) are a best practice to make
the configuration a bit more robust: they allow Jenkins to find the target
directory no matter how we have configured Jenkins to check out the source
code.
Another thing you often want to do is to archive your build results. Jenkins can store a copy of the binary artifacts generated by your build, allowing you to download the binaries produced by a build directly from the build results page. It will also post the latest binary artifacts on the project home page, which is a convenient way to distribute the latest and greatest version of your application. You can activate this option by ticking the “Archive the artifacts” checkbox and indicating which binary artifacts you want Jenkins to archive. In Figure 2.18, “Configuring JUnit test reports and artifact archiving”, for example, we have configured Jenkins to store all of the JAR files generated by this build job.
Now we’re done—just click on the Save button at the bottom of the screen. Our build job should now be ready to run. So let’s see it in action!