Once you save your new build job, Jenkins will display the home page for this job (see Figure 2.19, “Your first build job running”). This is where Jenkins displays details about the latest build results and the build history.
If you wait a minute or so, the build should kick off automatically—you can see the stripy progress bar in the Build History section in the bottom left hand corner of Figure 2.19, “Your first build job running”. Or, if you are impatient, you can also trigger the build manually using the Build Now button.
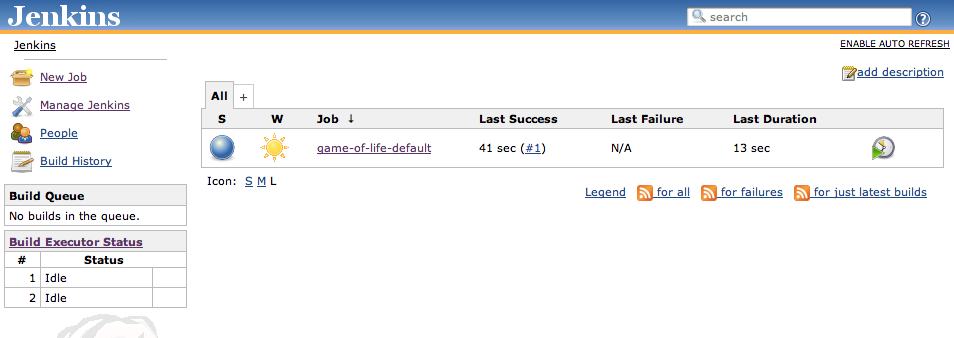
The build will also now figure proudly on your Jenkins server’s home page (see Figure 2.20, “The Jenkins dashboard”). This page shows a summary of all of your build jobs, including the current build status and general state of heath of each of your builds. It tells you when each build ran successfully for the last time, and when it last failed, and also the result of the last build.
Once of Jenkins’s specialities is the way it lets you get an idea of build behavior over time. For example, Jenkins uses a weather metaphor to help give you an idea of the stability of your builds. Essentially, the more your builds fail, the worse the weather gets. This helps you get an idea of whether a particular broken build is an isolated event, or if the build is breaking on a regular basis, in which case it might need some special attention.
You can also manually trigger a build job here, using the build schedule button (that’s the one that looks a bit like a green play button on top of a clock).
When the build finishes, the ball in the Build History box becomes solid blue. This means the build was a success. Build failures are generally indicated by a red ball. For some types of project, you can also distinguish between a build error (such as a compiler error), indicated by a red ball, and other sorts of build failures, such as unit test failures or insufficient code coverage, which are indicated by a yellow ball. There are also some other details about the latest test results, when the last build was run, and so on. But before we look at the details, let’s get back to the core business model of a Continuous Integration server—kicking off builds when someone changes the code!
We are going to commit a code change to GitHub and see what happens, using the source code we checked out in Section 2.2.5, “Forker le dépôt des exemples”. We now have Jenkins configured to monitor our GitHub fork, so if we make any changes, Jenkins should be able to pick them up.
So let’s make a change. The idea is to introduce a code change that will cause the unit tests to fail. If your Java is a bit rusty, don’t worry, you won’t need to know any Java to be able to break the build—just follow the instructions!
Now in normal development, you would first modify the unit test that describes this behaviour. Then you would verify that the test fails with the existing code, and implement the code to ensure that the test passes. Then you would commit your changes to your version control system, allowing Jenkins to build them. However this would be a poor demonstration of how Jenkins handles unit test failures. So in this example, we will, against all best practices, simply modify the application code directly.
First of all, open the Cell.java file, which you will find in the
gameoflife-core/src/main/java/com/wakaleo/gameoflife/domain
directory. Open this file in your favorite text editor. You should see
something like this:
package com.wakaleo.gameoflife.domain;

public enum Cell {
    LIVE_CELL("*"), DEAD_CELL(".");

    private String symbol;

    private Cell(String symbol) {
        this.symbol = symbol;
    }

    @Override
    public String toString() {
        return symbol;
    }

    static Cell fromSymbol(String symbol) {
        Cell cellRepresentedBySymbol = null;
        for (Cell cell : Cell.values()) {
            if (cell.symbol.equals(symbol)) {
                cellRepresentedBySymbol = cell;
                break;
            }
        }
        return cellRepresentedBySymbol;
    }

    public String getSymbol() {
        return symbol;
    }
}
The application can print the state of the grid as a text array.
Currently, the application prints our live cells as an asterisk
(*), and dead cells appear as a minus character
(–). So a five-by-five grid containing a single living
cell in the center would look like this:
-----
--*--
-----
Now users have asked for a change to the application—they want
pluses (+) instead of stars! So we are going to make a
slight change to the Cell class method, and rewrite it as
follows (the modifications are in bold):
package com.wakaleo.gameoflife.domain;

public enum Cell {
    LIVE_CELL("+"), DEAD_CELL(".");

    private String symbol;

    private Cell(String symbol) {
        this.symbol = symbol;
    }

    @Override
    public String toString() {
        return symbol;
    }

    static Cell fromSymbol(String symbol) {
        Cell cellRepresentedBySymbol = null;
        for (Cell cell : Cell.values()) {
            if (cell.symbol.equals(symbol)) {
                cellRepresentedBySymbol = cell;
                break;
            }
        }
        return cellRepresentedBySymbol;
    }

    public String getSymbol() {
        return symbol;
    }
}
Save this change, and then commit them to the local Git repository
by running git commit:
$ git commit -a -m "Changes stars to pluses"
[master 61ce946] Changes stars to pluses
 1 files changed, 1 insertions(+), 1 deletions(-)
This will commit the changes locally, but since Git is a distributed
repository, you now have to push these changes through to your fork on
GitHub. You do this by running git push:
$ git push
Counting objects: 21, done.
Delta compression using up to 4 threads.
Compressing objects: 100% (7/7), done.
Writing objects: 100% (11/11), 754 bytes, done.
Total 11 (delta 4), reused 0 (delta 0)
To git@github.com:john-smart/game-of-life.git
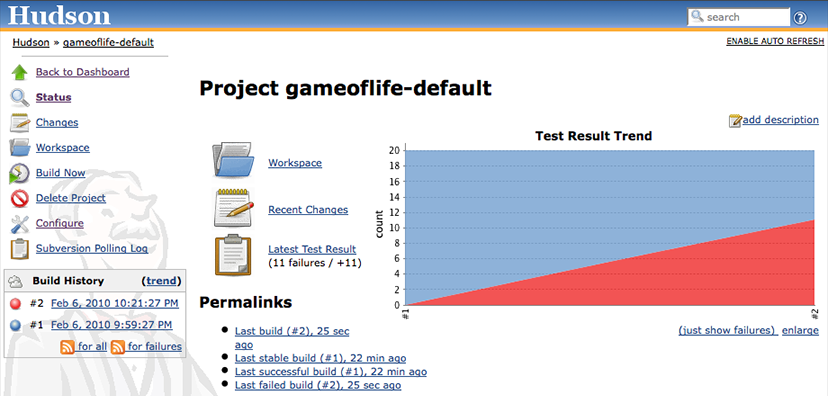
7882d5c..61ce946 master -> masterNow go back to the Jenkins web page. After a minute or so, a new build should kick off, and fail. In fact, there are several other places which are affected by this change, and the regression tests related to these features are now failing. On the build job home page, you will see a second build in the build history with an ominous red ball (see Figure 2.21, “A failed build”)—this tells you that the latest build has failed.
You might also notice some clouds next to the Build History title—this is the same “weather” icon that we saw on the home page, and serves the same purpose—to give you a general idea of how stable your build is over time.
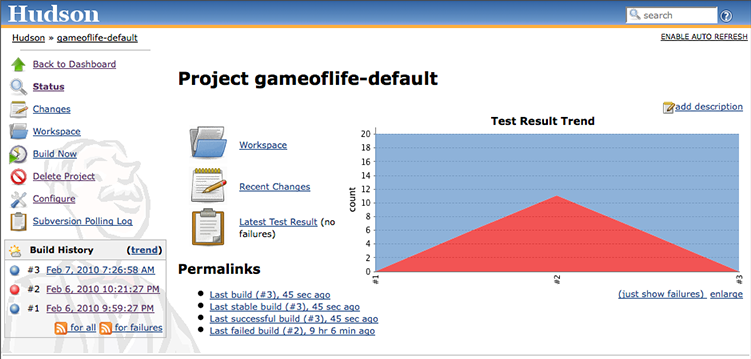
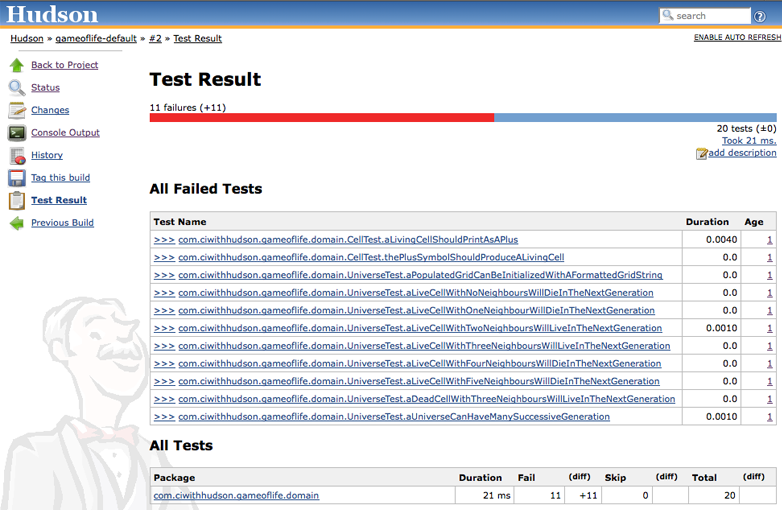
If you click on the new build history entry, Jenkins will give you some more details about what went wrong (see Figure 2.22, “The list of all the broken tests”). Jenkins tells us that there were 11 new test failures in this build, something which can be seen at a glance in the Test Result Trend graph—red indicates test failures. You can even see which tests are failing, and how long they have been broken.
If you want to know exactly what went wrong, that’s easy enough to figure out as well. If you click on the failed test classes, Jenkins brings up the actual details of the test failures (see Figure 2.23, “Details about a failed test”), which is a great help when it comes to reproducing and fixing the issue.
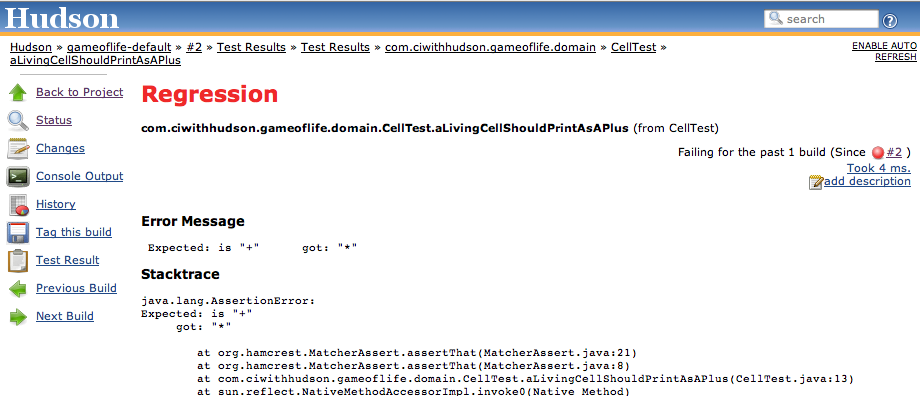
Jenkins displays a host of information about the failed test in a very readable form, including the error message the test produced, the stack trace, how long the test has been broken, and how long it took to run. Often, this in itself is enough to put a developer on the right track towards fixing the issue.
Now let’s fix the build. To make things simple, we’ll just back out
our changes and recommit the code in its original state (the end users
just changed their mind about the asterisks, anyway). So just undo the
changes you made to the Cell class (again, the changes
are highlighted in bold):
package com.wakaleo.gameoflife.domain;

public enum Cell {
    LIVE_CELL("*"), DEAD_CELL(".");

    private String symbol;

    private Cell(String symbol) {
        this.symbol = symbol;
    }

    @Override
    public String toString() {
        return symbol;
    }

    static Cell fromSymbol(String symbol) {
        Cell cellRepresentedBySymbol = null;
        for (Cell cell : Cell.values()) {
            if (cell.symbol.equals(symbol)) {
                cellRepresentedBySymbol = cell;
                break;
            }
        }
        return cellRepresentedBySymbol;
    }

    public String getSymbol() {
        return symbol;
    }
}
When you’ve done this, commit your changes again:
$git commit -a -m "Restored the star"[master bc924be] Restored the star 1 files changed, 1 insertions(+), 1 deletions(-) $git pushCounting objects: 21, done. Delta compression using up to 4 threads. Compressing objects: 100% (7/7), done. Writing objects: 100% (11/11), 752 bytes, done. Total 11 (delta 4), reused 6 (delta 0) To git@github.com:john-smart/game-of-life.git 61ce946..bc924be master -> master
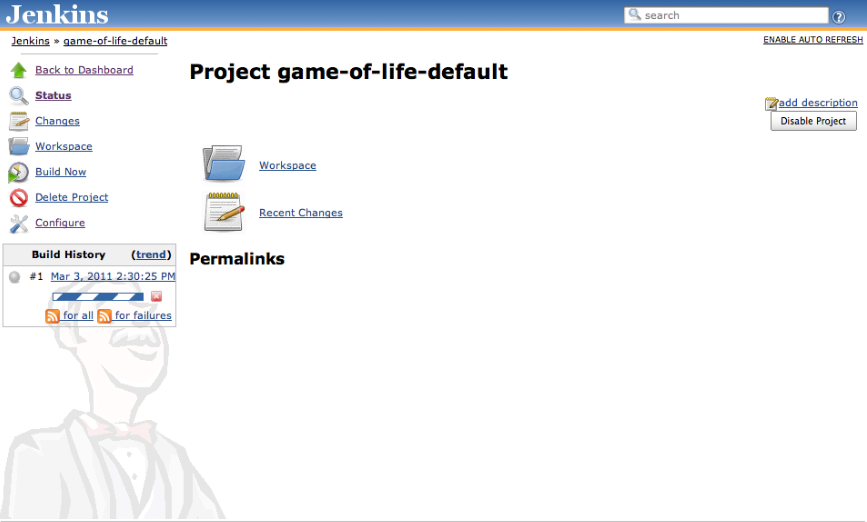
Once you’ve committed these changes, Jenkins should pick them up and kick off a build. Once this is done, you will be able to see the fruit of your work on the build job home page (see Figure 2.24, “Now the build is back to normal”)—the build status is blue again and all is well. Also notice the way we are building up a trend graph showing the number of succeeding unit tests over time—this sort of report really is one of Jenkins’s strong points.